


Patination limits commutator life! This guide helps you in making the judgement about the lifespan, commutation set and running behaviour of commutator by analyzing its appearance. Moreover, if you observe the symptoms of commutator damage, you can easily replace carbon brushes by following the steps mentioned in this guide.
Being a technical person, we are much familiar with the term of electrical machine i.e. Commutator. It’s a device to reverse the direction of electric current in motor or dynamo. Adding more, Patina is a thin layer formed as a result of the oxidation reaction and other chemical processes on the surface of wooden articles, certain stones and metals like copper, brass, bronze and other similar metals. Consequently, patination reduces the lifespan of a metal. Patination is prominent in metals. The patina layer is of different colors depending upon the level of patination and characteristic of metal. But, blue and green are the most frequent colors of patina.
Commutator Assessment
In addition to the appearance of the surface of the commutator, patina is also important in the good running of commutators. Each commutator builds a characteristic patina layer comprised of copper oxides, graphite deposits and absorbed water. Operating and ambient conditions affect this layer. Commutator manufacturers and users consider the following figures as a guide to assist in judging the operation.
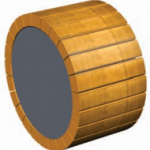
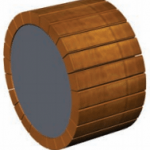
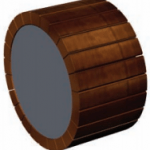
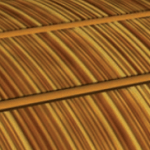
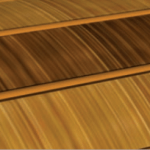
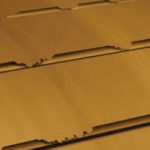
Commutator with Acceptable Condition
It contains three subordinate types. Commutator with satisfactory condition determines the normal operation and more useful life. It indicates good carbon brush performance, ideal commutator condition for maximum brush and commutator useful life and the acceptable condition of the commutator respectively.
Light Film

Causes
- Light Load
- Low Humidity
- Film Reducing Contamination
- Brush Grade with Low Filming Rate
Medium Film
Causes
- Normal Operation
- Good Brush Grade
- Normal Loading Condition
Heavy Film
Causes
- Heavy Load
- Light Humidity
- Brush Grade with High Filming Rate
- High Resistance Contamination
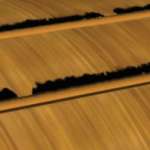
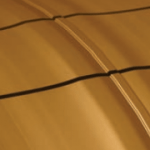
Commutator with Alarming Condition
Normally, when patina layer starts damaging the commutator then alarming condition comes. At this stage, we can do troubleshooting of commutator by simply visualizing the commutator crust. Each of the following figures comes out as a result of patination and followed by its causes.
Streaking
Causes
- Loads with Low Current
- Low or Unequal Spring Pressure
- High Humidity
- Contamination
- Copper Particle Pickup form Commutator
Threading
Causes
- Uneven Current Distribution in Armature Winding
- Low Spring Pressure
- Contaminated Atmosphere
- High Humidity
- Load Current Loads
- Long Period of Loading Conditions
Bar Edge Burning
Causes
- Incorrect Brush Alignment
- Incorrect Inter-pole Strength
- Unequal Spring Pressure
- Low Brush Grade
- Sparking
Grooving
Causes
- Abrasive Brush Grade
- Low Humidity
- Contaminated Atmosphere
- Low or Unequal Spring Pressure
Slot Bar Marking
Causes
- Uneven Current Distribution in Armature Winding
- Inconsistency in Armature Related to Coils, Slots and Commutator Bars
- Unequal Number of Winding in Adjacent Coils
Photographing

Causes
- Mechanical Problems
- High Humidity
- High Resistance at the Area of Rotation
Copper Drag
Causes
- Excessive Vibration
- High Friction
- Wrong Brush Grade
- Unequal Spring Pressure
- Overheating in Commutator
Furthermore, some causes are common among the alarming conditions. Regardless the type of condition, you must go for the replacement of carbon brushes. Because it’s the pivotal cause of damage. Here, we provide you easy steps for Carbon Brush Installation.
Carbon Brush Installation
- Above all, disconnect the electrical power to the machine by using the approved lock-up procedure.
- Remove the old brushes from holders. Additionally, make a thorough inspection of the brushes. Note down the unhealthy condition of brushes like roughness, heating and burning contacts etc. Firstly, it’ll help you in suggesting the improved design of brushes to the manufacturers. Secondly, it assists technical persons in the maintenance of the machine.
- Likewise, inspect the commutator for unusual conditions and save your remarks.
- Perform the cleansing action in the cavity of the holder. Remove dust, dirt, oil deposits and carbon prints etc. On balance, look at the corrosion and burnout.
- Clean up the terminal area, if needed.
- Correspondingly, check the alignment and looseness of the brush holder.
- Comparatively, measure the spring pressure. Note that recommended spring pressure is 4.0+ PSI.
- For the use of different grade brush, remove the old carbon film from the brush track. You can use dry untreated canvas with a pressure block or a rubber abrasive. Seater stone is available as the alternative. Moreover, vacuum blows out the dust of the machine.
- Install new carbon brushes in the holders on the proper angle, so that, they can move freely.
- Apply the pressure spring to the top of brush.
- Pull on the brush to make gentle contact with the commutator.
- Connect all the electrical contacts. But, there should be proper tightness and security of the contacts.
- Carefully, seat the brushes to the contour of the commutator using non-metal bearing sandpaper or garnet paper.
- Furthermore, operating the machine at no load. This procedure allows the brushes to make intimate contact in its operating position in the holder.
- By and large, the machine is ready to use. This procedure can reduce the high friction and brush dust developed during the initial film forming period.
Warning
In some cases, time allotment, operating conditions, or performance issues may require the replacement of less than a full set of brushes without normal seating. Then, it is especially important to adhere to step 11 with extended operation at no-load. Shortcuts on procedures for brush installation will result in excess electrical damage to the brush face and the contact surface.