


Security and privacy are the two things which prove to be a concern to most of the people. Everyone wants their data to be protected from being falling into bad hands. These days, electronic messages (email) are a part of our normal communication methods. We write different types of emails throughout the day. Majority of the people use email service providers like Gmail.com, Yahoo.com, Outlook.com etc. for sending/receiving email messages.
People assume that their emails are safe while using a well-known email providers as these companies are very serious about their security. The fact is that those email providers are actually safe but Are your email messages? which are being sent in normal english text instead of being encrypted.
Majority of the emails being sent/received aren’t encrypted. It means that anyone receiving them/sending them can see them straight away. This isn’t a big concern as you’ll most likely be sending the email message to the right person. But what happens when other person (third party) try to read your emails? They can read them too.
There can be a lot of third parties in this scenario. For example:
- An attacker performing Man in the Middle (MITM) attack
- A person whom you mistakenly sent your message
- An attacker who hacked your email account can see your sent/received email messages
- Government spying on you
To avoid the above from happening, It’s better to start encrypting.
While searching for encryption, you’ll find yourself getting confused between three terms. PGP, OpenPGP, and GPG. They might look confusing but once you know how each of them is related to the other, you’ll find it quite easy.
Pretty Good Privacy (PGP) is a software created by Phil Zimmerman in 1991. It uses different methods for encrypting the data such as data compression, hashing etc. It is now owned by Symantec Corporation.
OpenPGP is a standard of PGP defined by Working Group of the Internet Engineering Task Force (IETF). It is open-source for public use.
GNU Privacy Guard (GPG) provides users with a GUI to encrypt their files. It also works on the OpenPGP standard.
How Does It Work?
It’s very easy to understand how PGP encryption works. There are two keys, Public and a Private key. Public keys are used for encrypting the messages and the Private keys are used for decrypting the messages.
To send an encrypted message to your friend, you’ll need his Public key. Once he has received the message, he’ll use his Private key to decrypt the message and read the content. Similarly, people will use your Public key to send you encrypted messages and you’ll use your Private key to decrypt them.

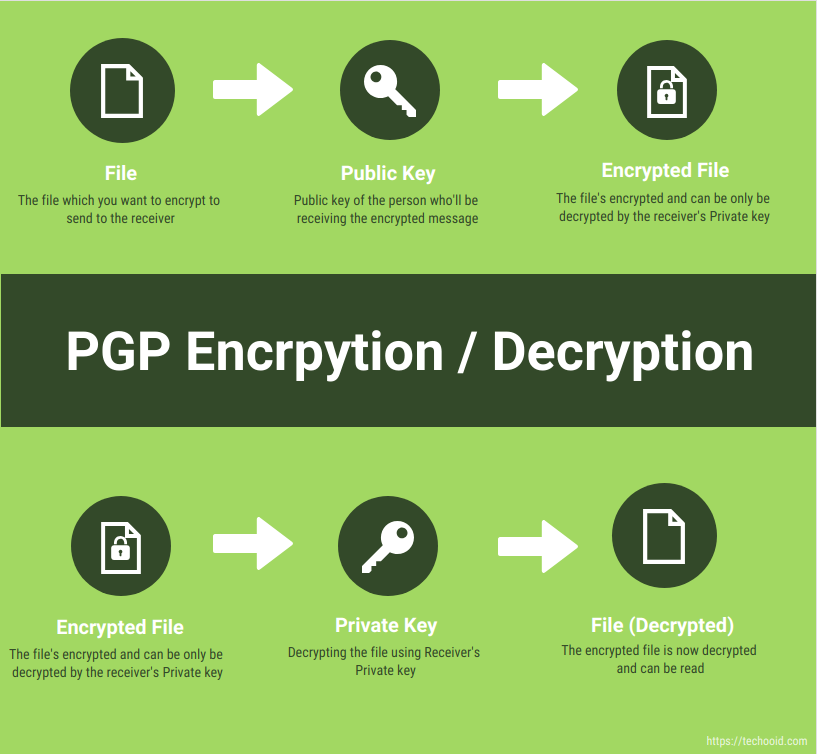
Keep in mind that the Private key is meant to be private. If someone has access to your Private key, that person can also decrypt the email messages sent to you.
Generate Your Key Pairs
The reason this encryption method is not being used everywhere is that people think It’s really hard for beginners to setup something like this. Well, to be honest, It’s a little hard for someone who has no experience but we’ll try our best to show you the easiest ways of doing this.
Since this post is focused towards email sending, we’ll be showing you two methods of encrypting your emails
1. Mailvelope (Browser Extension)
This is one of the easiest methods. You aren’t required to set up a lot of things. You just need to download this extension called Mailvelope. Mailvelope enables the exchange of encrypted emails following the OpenPGP encryption standard. It is available for free both for Google Chrome and Mozilla Firefox. It also only works with online webmail providers. This is the recommended option If you are trying things for the first time and only want to send/receive encrypted emails without going into much complexity.
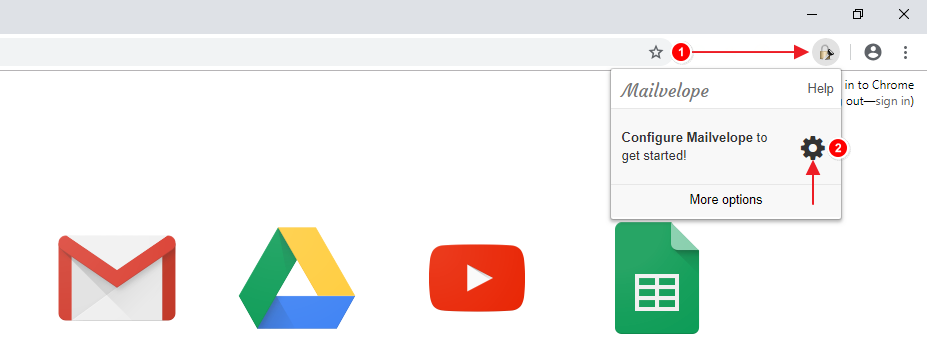
- Install the extension in your browser. We’re using Google Chrome in our case. Then click the extension icon and open Mailvelope configuration page by clicking the gear icon.

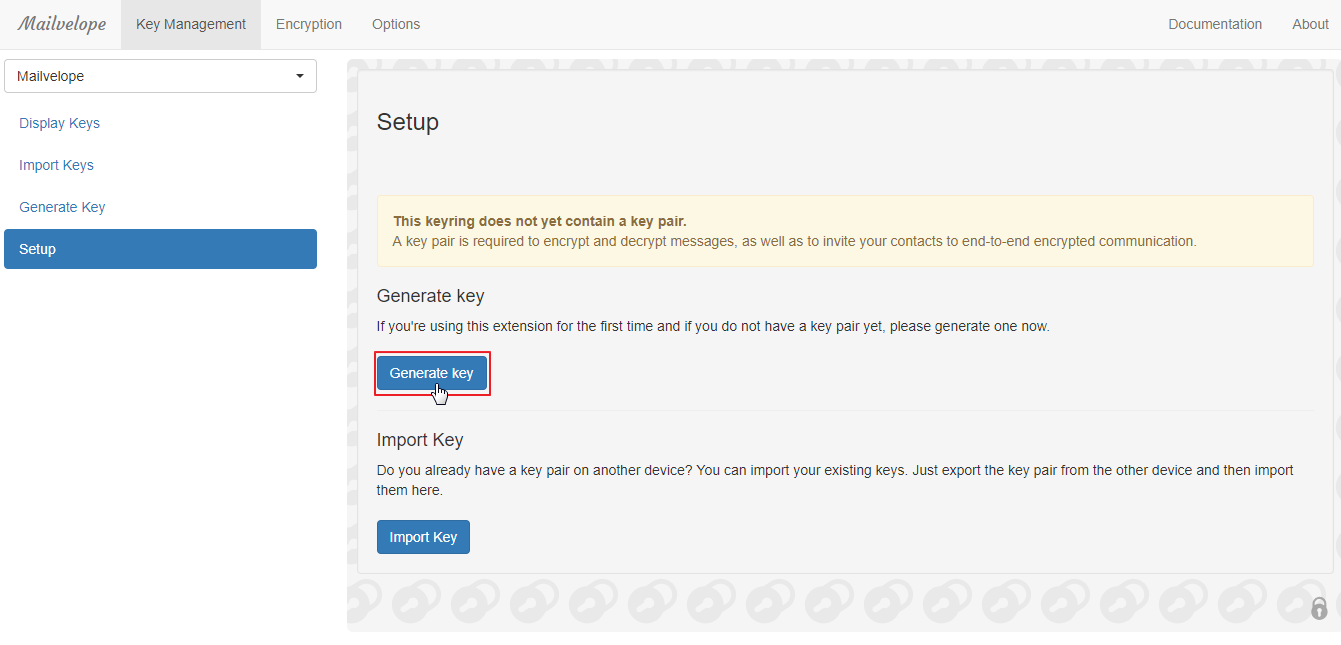
- Click on Generate Key.

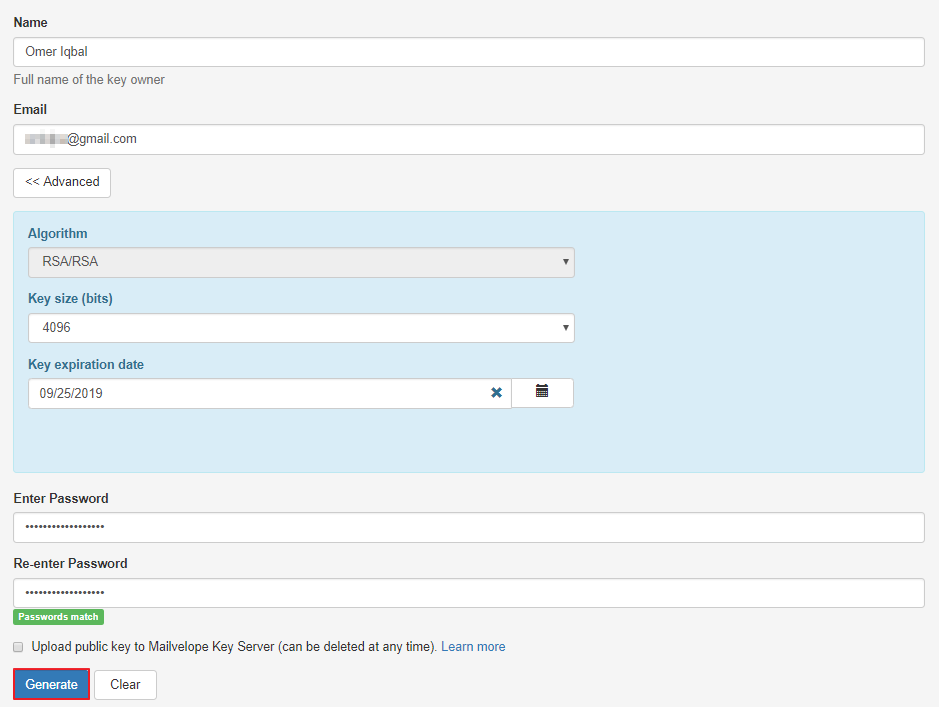
- Enter your Name, Email Address, A strong password and hit Generate. You can also set an Expiration date for your key to expire by clicking on Advanced.

- It’ll take a couple of seconds while generating the key. Once It’s finished, It’ll tell you that a new Key is generated and imported into keyring.
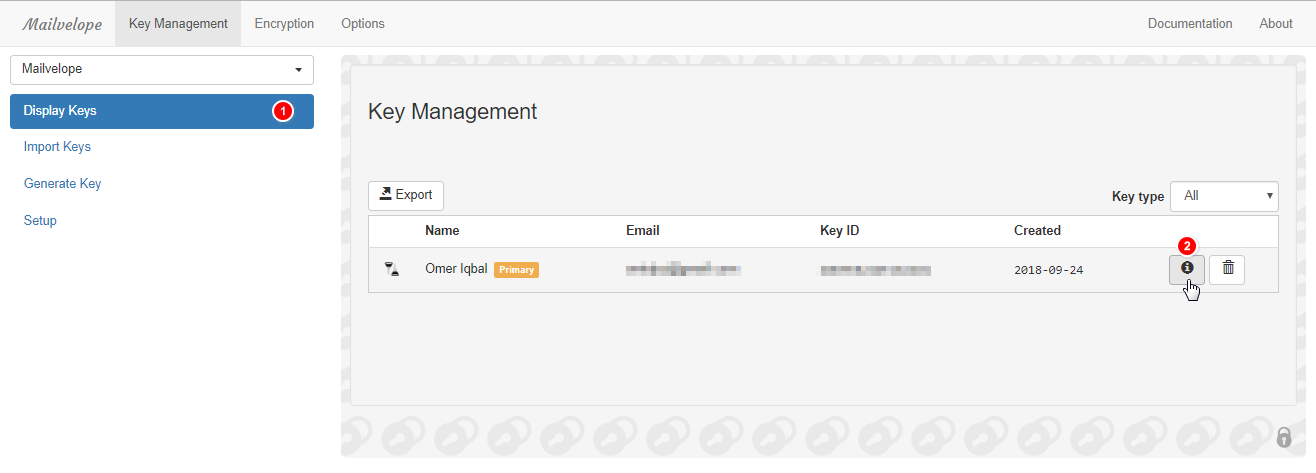
- Now your key pair is generated. You can send your public key to people from whom you want to receive encrypted messages. To export your public key, click on Display Keys. Then click on the “i” icon.

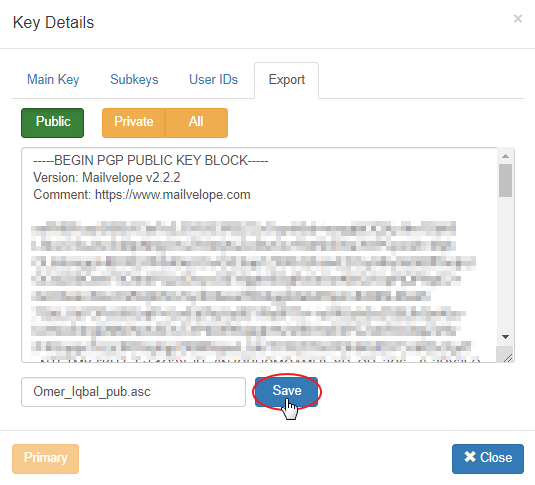
- A box would open. Go to the Export tab. From here you’ll be able to see your Public/Private keys. You can also save your Public/Private keys to your computer. Choose the Public Key and click Save button to save It on your computer. Then send It to the people from whom you want to receive encrypted emails. You can also upload your Public key on key servers for everyone else to see.

Sending/Receiving Encrypted Messages
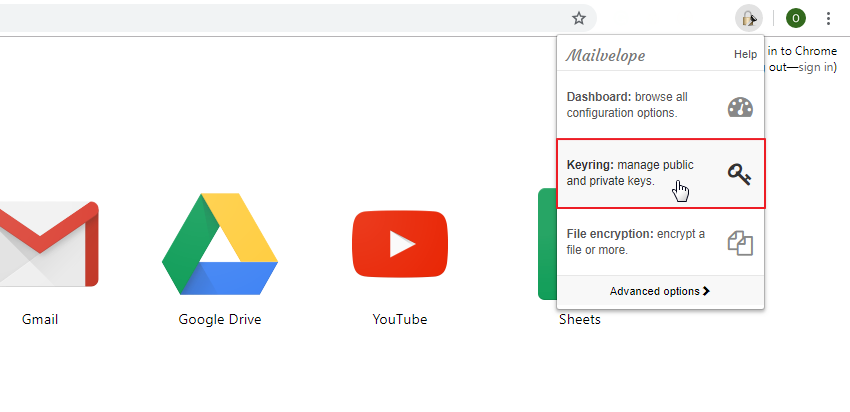
To send out encrypted messages, you’d need the Public key of your recipients. Once you have the public key of your recipient, click on Mailvelope icon and go to Keyring.

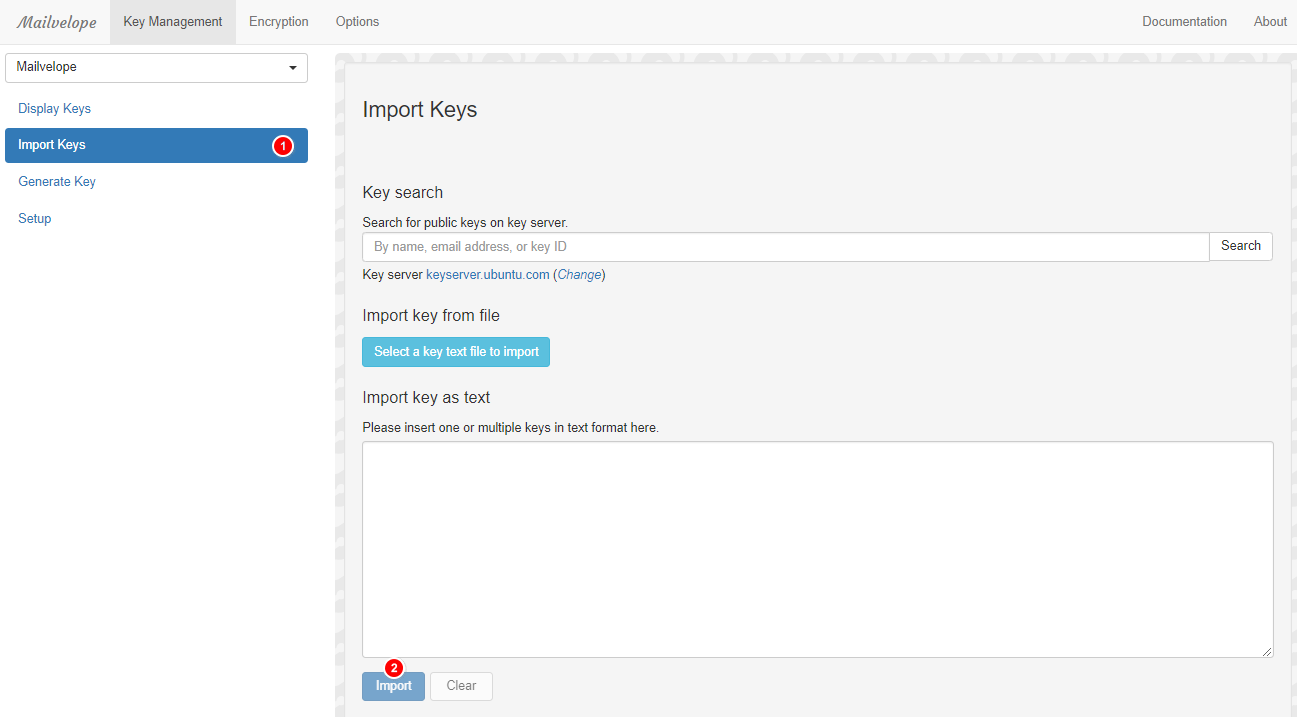
Then click on Import Keys. You have three options to import the keys into Mailvelope. Either by searching on public key server, by uploading the file or by manually pasting the key. Now click Import button and the key would be successfully imported.

Now we can write an encrypted message to our recipient. Go to any email service provider (Gmail in our case). Write a new email and you’ll start seeing Mailvelope icon there. Click on that icon.

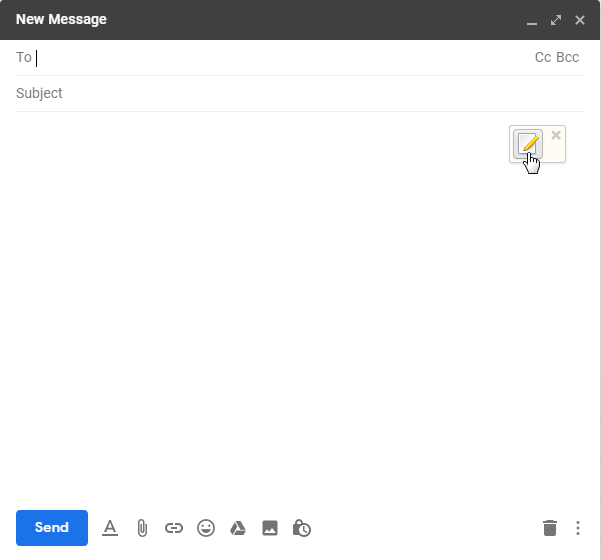
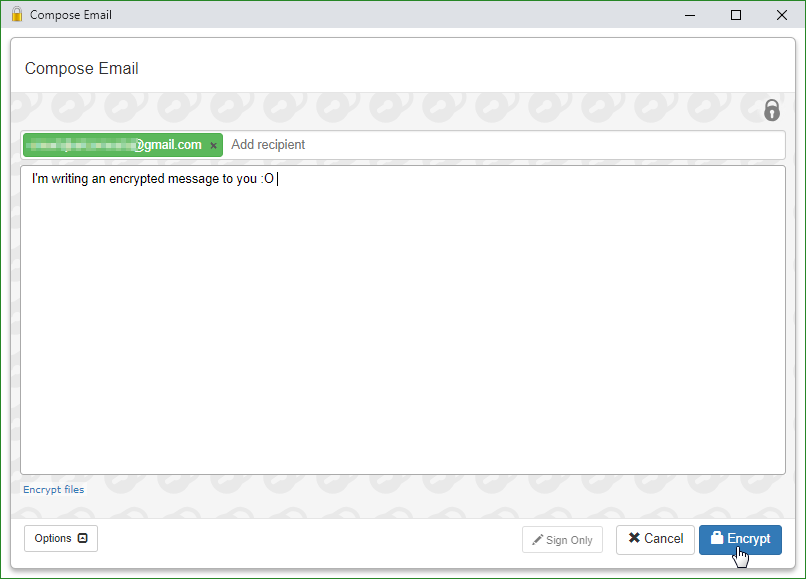
A new window would appear. Enter your recipient email address, and the message that you’d like to encrypt. As soon as you’ll hit the Encrypt button, your message would be encrypted and pasted into the email body to send. Enter the subject and send your message.

Similarly, when you’ve received an encrypted message, Mailvelope would detect It automatically and will start showing a key icon on your message content. Clicking on It would result in a box asking you for your password to decrypt the message.

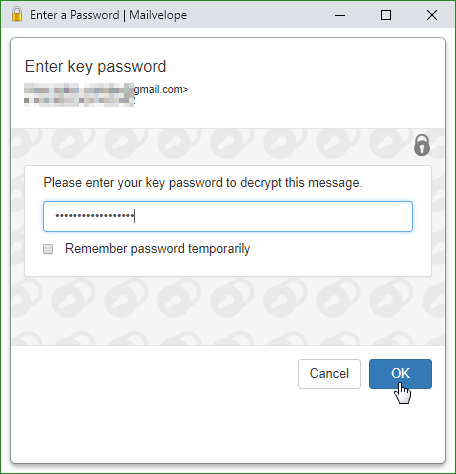
Your message would be decrypted and read-able to you.
2. GnuPG – Thunderbird – Enigmail
If Mailvelope doesn’t work for you or you need a more robust solution then you should go with this one. It uses
- GnuPG
- Mozilla Thunderbird
- Enigmail (add-on for Thunderbird)
All of the above tools is available to download for Windows, Linux and macOS. Linux distributions usually have GnuPG pre-installed. You can verify If you have It installed by typing the following command in the terminal.
gpg --version
Download and Install GnuPG
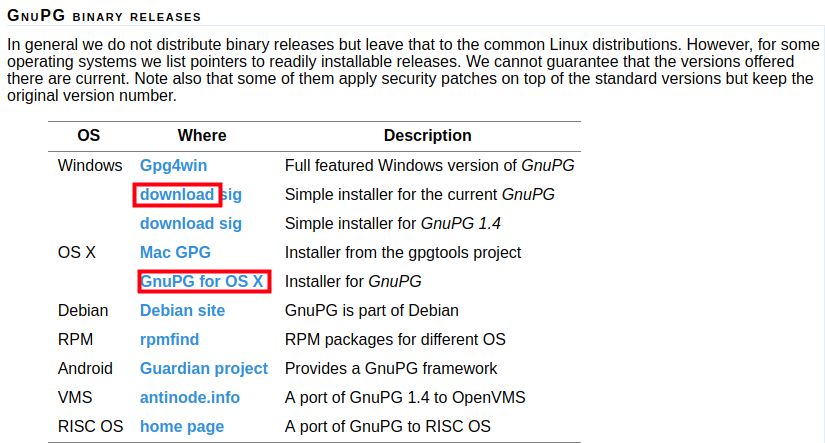
- Go to GnuPG official website and scroll down to GnuPG Binary releases section. Download Simple installer for the current GnuPG If you’re on Windows and Installer for GnuPG If you’re using macOS.

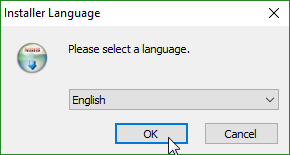
- After downloading, start the installer. Select English as the language and click Ok.

- Hit Next a couple of times and then click Install.

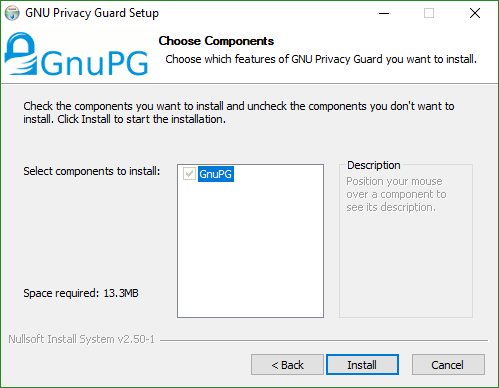
- After the installation is completed, hit the Finish button. Now GnuPG is installed on your computer.
Download and Install Thunderbird
- Visit Thunderbird website and download the latest version.


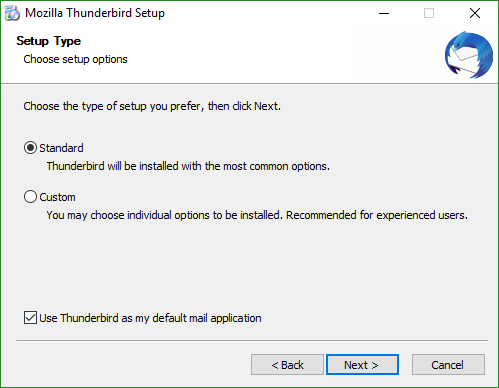
- After downloading, start the installer and hit Next.
- Then choose Standard and hit Next.
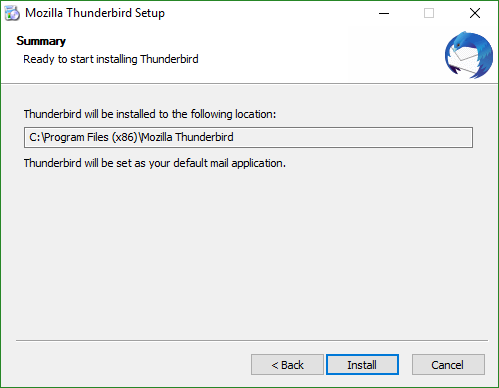
- Then click Install and Thunderbird would be installed.
Setup Thunderbird
When you’ll first Open up Thunderbird, you’ll be asked to Setup an Existing Email account or Create a New Email Address.

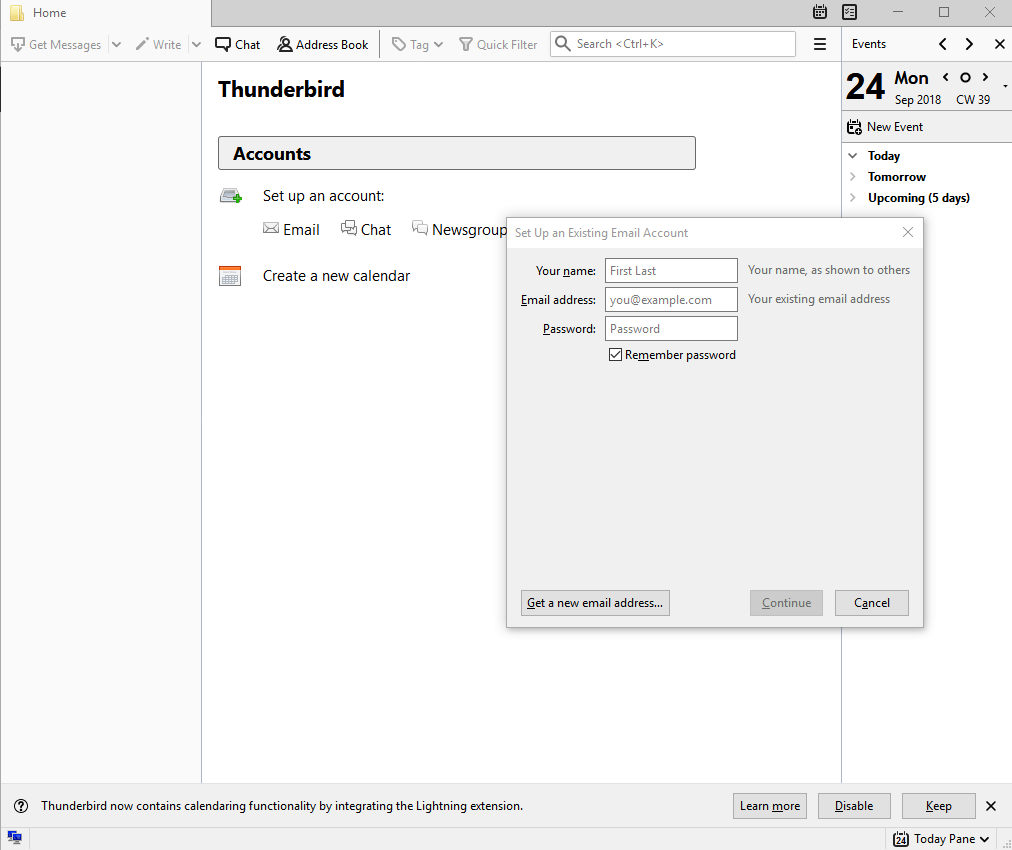
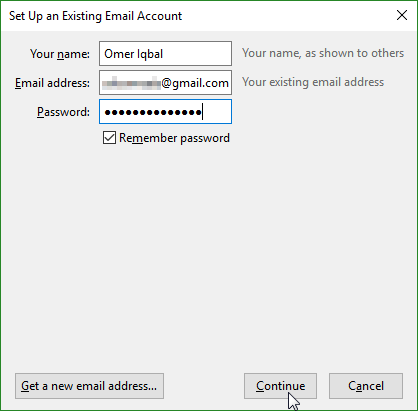
Enter your Name, Email address, and Password and hit Continue.

Most of you people reading this would be using popular email service providers like Gmail, Yahoo, and Outlook etc. Thunderbird will automatically detect the necessary settings for your email service providers. Then click Done.

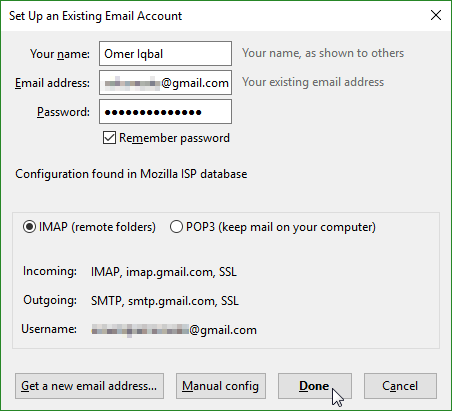
If Thunderbird have failed to auto-detect the settings for your email provider, You can manually search for those settings and put them in by clicking on Manual Config button.
As we’re using Gmail in our case. After clicking Done, a box would open asking us to login to your email service provider to give Thunderbird the permission to access our emails. Not all the email service providers would ask for permissions, some will directly log you on If you’ve entered the correct password.
Just give the Thunderbird permissions by clicking Allow and you’re good to go.
Download and Install Enigmail
Enigmail is an add-on for Thunderbird. We can install It directly from Thunderbird Itself.
- Click on the Menu icon on your Thunderbird and click on Addons.

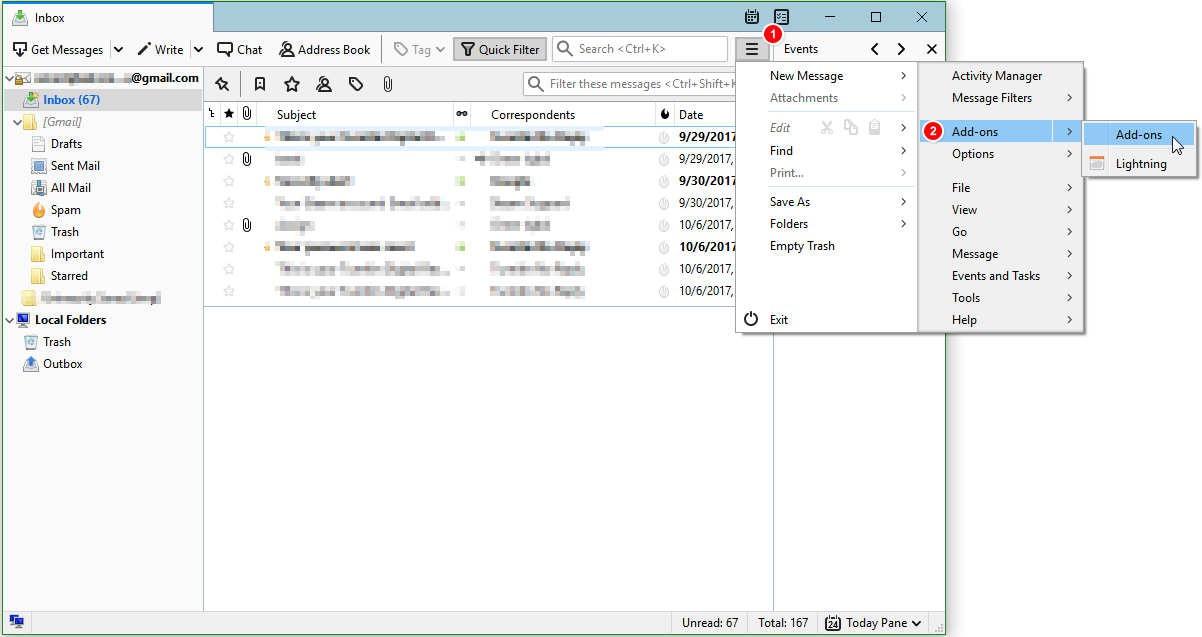
- A box would open. Scroll down and you’ll be able to see Enigmail in Featured Add-ons. Click on It. If It is not available there, you can go to Extensions tab and search for Enigmail.
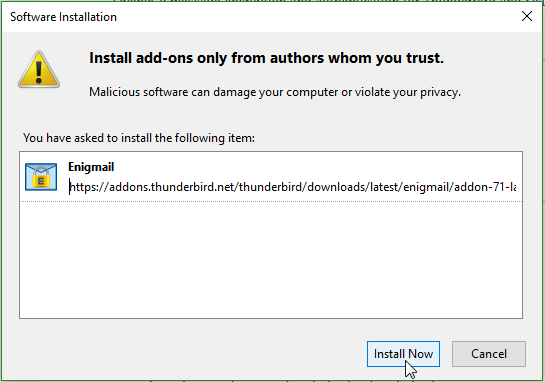
- Click Add to Thunderbird. It’ll warn you about by saying Only Install from authors you trust. Click Install.

Generate Key Pair
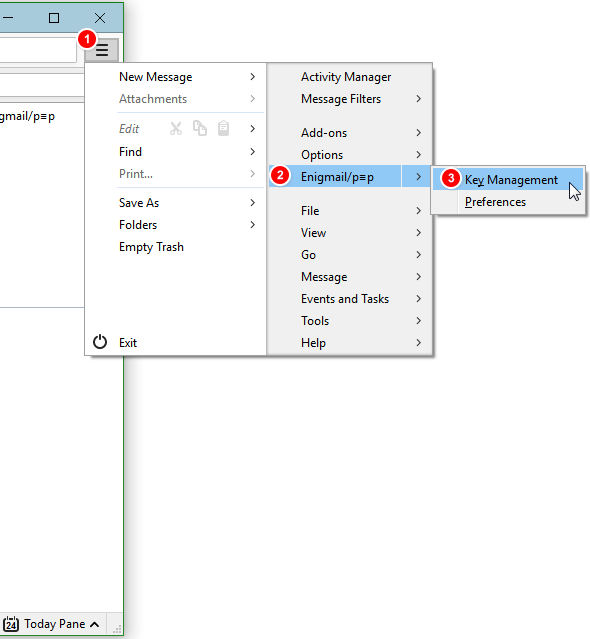
- After It’s installed, Go to Menu -> Enigmail -> Key Management.

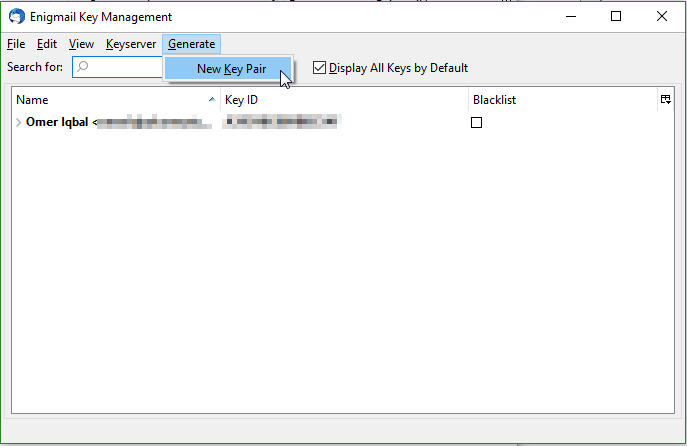
- Now click Generate and then select New Key Pair.

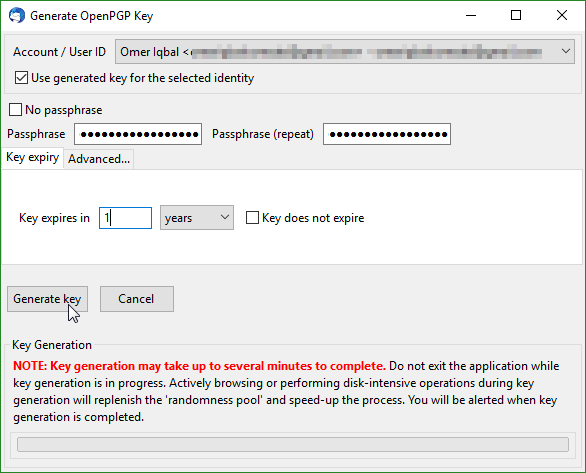
- A new box would open asking you for some details. Enter a strong paraphrase. Enter after how many years the key should expire and click Generate Key. You can also extend your key’s expiration date or replace that key with a completely new key or even set no expiration date at all.

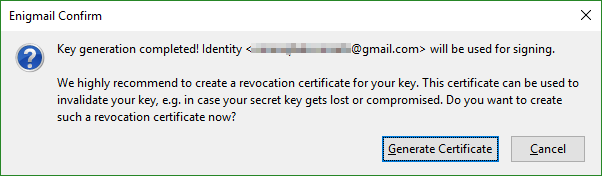
- It’ll ask you to confirm just hit Generate Key and It’ll start generating your key. After your key has been generated, It’ll ask you whether you want to generate a revocation certificate for your key or not. It is recommended to have a reovcation certificate. A revocation certificate would help you to invalidate your keys in-case they get lost/stolen. Generate the certificate. It’ll ask you for the paraphrase of your key. After the certificate is generated save It somewhere on your computer for now. It’s recommended to save It somewhere else like on a Flash drive etc.

Exporting Keys
You can also export your Public/Private keys. To export your keys, go to Key Management (Menu -> Enigmail -> Key Management). Right click on the key you want to export and click Export Keys to File. It’ll give you two options whether you want to export your Public key or Secret key. Since we want to give out our Public key to other people to receive messages, we’d only export our Public Key.


Now you can send out the exported Public key to the people from whom you want to receive messages. You can also upload your Public keys to key servers for everyone else to see.
Sending/Receiving Encrypted Messages
To send Encrypted messages, you’ll first need the Public key of your recipient. If you have It, you’ll need to Import it in Thunderbird. You can easily do that by going into Key Management -> File -> Import Keys from File and choose the Public key file of your recipient.
Now click on Write in Thunderbird to write an email message. Enter your recipient email address. Type the subject and enter your message. You’ll notice that the moment you enter your recipient email address, a lock icon (Encryption) would turn on. This means that the message would be encrypted. You can also click on the Pencil icon (next to the lock icon) to Sign the email. It helps the recipient verify the authenticity of the email.

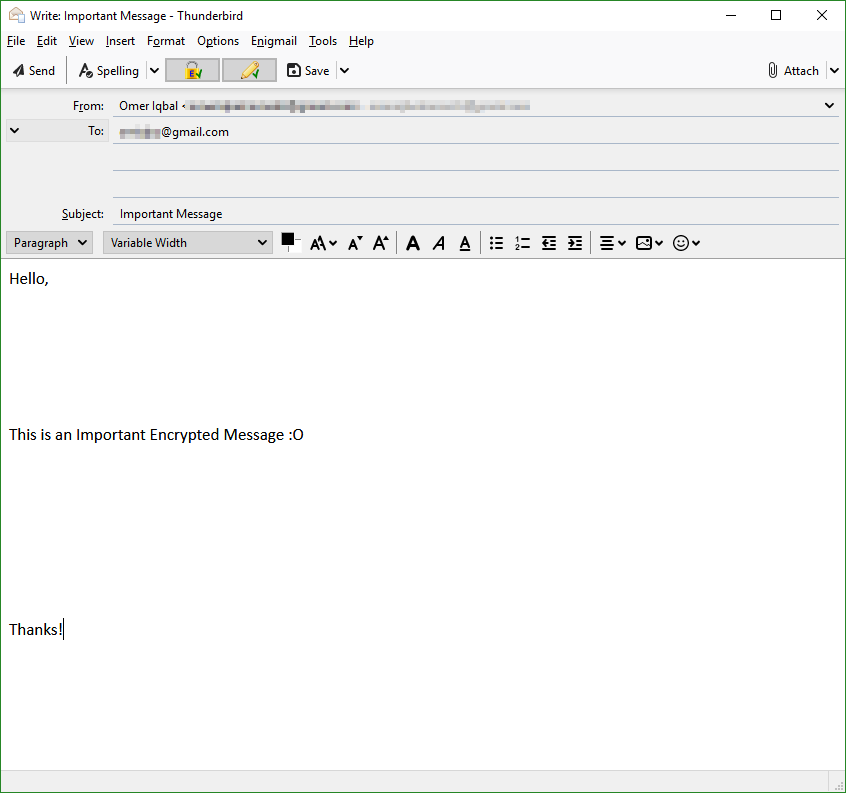
Then click on Send. It’ll ask you for the paraphrase and your message would be sent.
When you’ve received a message encrypted with your Public key, Thunderbird would automatically ask you for the paraphrase to unlock the encrypted message and you’ll be able to read your decrypted message easily.
Disabling HTML in Emails
In May 2018, several vulnerabilities in PGP were revealed. Due to these, your decrypted messages could get revealed to third parties without you noticing It. The developers have already patched It up and you can keep viewing HTML in your email messages in Thunderbird but It’s still recommended to turn off HTML.
To turn off HTML in Thunderbird, Go to Menu -> View -> Message Body As -> Plain Text

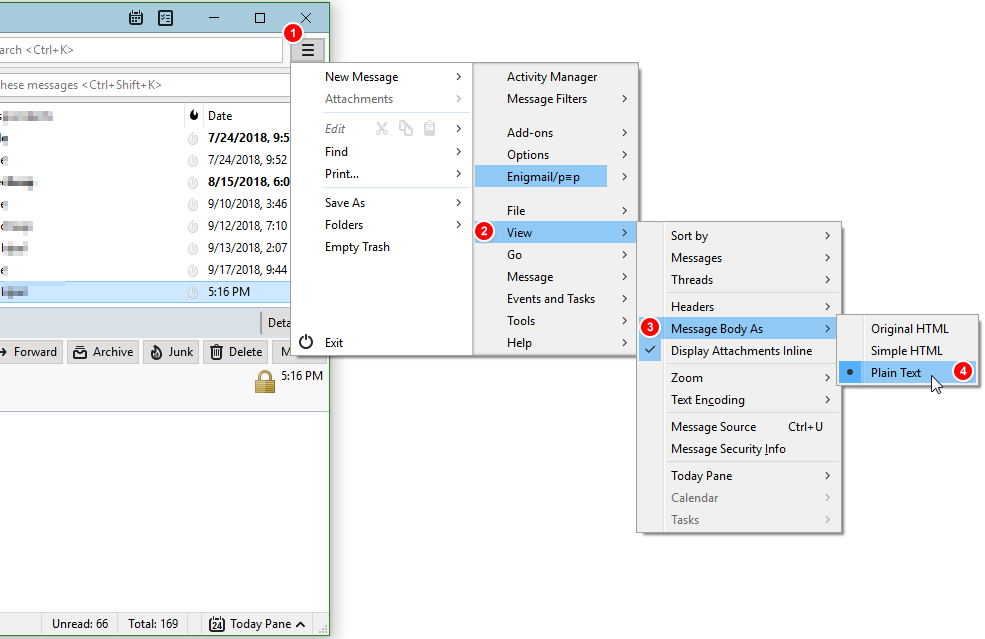
Now the HTML is turned off for your email messages.
If you have any questions regarding this post, feel free to ask us through comments.