This is a hands-on tutorial on how to draw plasmid maps using PowerPoint.
PowerPoint is a nice friend of every biotechnologist when it comes to presenting complex work to audiences. You may come across the Plasmids especially when you are working in Microbial Genetics or Recombinant DNA Technology. Presenting the schematic diagram of your plasmid without copy-pasting from Google can be a nightmare for you.
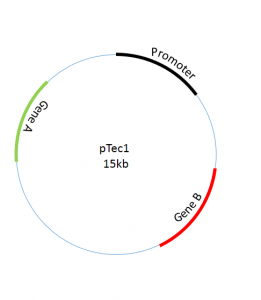
Let’s make it easy for you and learn to Draw schematic plasmids/vectors maps in PowerPoint with few simple steps. In this tutorial, we are going to use few built-in shapes to draw a plasmid which will look like something shown in figure 1.
Configuring Slides Size (optional)
- Open the PowerPoint application.
- Add new Blank Slide.
- Click on “Design” Tab.
- On Right side, Click on “Custom Size” Option in slide size icon.
Draw Plasmid Map Base
- Click the “Insert” tab
- Click on “Shapes” and select the “Arc” shape.
- Draw the Arc while holding the Shift key.
- Drag from the Yellow tiny square at each end of the arc and complete the circle.
Draw Important Regions of Plasmid
In this step, we will draw important regions of the plasmid such as promoter and insert fragment etc.
- Duplicate the circle by selecting and then “Ctrl+D”
- After Duplicating, select a shape and Click on “Format”
- Now click on the “Shape Outline”
- Change “Weight” and “Color” of the outline.
- Click on each of the shapes.
Figure 4: Drag shapes to base plasmid - Drag that tiny yellow square backward to decrease the size of each circle according to the region size.
- Place each colored shape on the base of the plasmid.
Annotations of Plasmid
This is about giving names to the regions which you just made on your plasmid.
- Add a “Text Box” from your Insert tab
- Write down appropriate annotations.
- To give circular shape to your text, Select the text
- Click on the Format tab
- Click on “Text Effects” then “Transform”
- Select the Appropriate design and drag them to the position.
Saving your Plasmid as PDF or PNG
You can save it as PDF or PNG to use it in any article or your other publication. So this how you do it.
- Click on “File”
- Select “Save as”
- Decide your destination
- Select “Portable Network Graphics (PNG)/PDF” in “Select as type” while saving.
Download: pTec1 Sample
Please make sure to share your views and comments with us in the comment section so we can make our tutorials better for you.
What is a Plasmid Map?
A plasmid map is an illustration or graphical representation of a plasmid. All the important locations on a plasmid are labelled such as Restriction Sites, Gene of Interest, Reporter Gene, Open Reading Frame. One can have all the necessary information on the plasmid by looking at it.
Previously plasmid maps were drawn by hand even in papers and thesis. That’s why it gets a bit difficult to understand the plasmids from the old papers and thesis. Now with the advancement, there are many tools that allow you to draw plasmids including PowerPoint. In this above tutorial, we have explained how you can draw plasmid maps using the Microsoft PowerPoint desktop tool. The whole process is very easy and you can even download the provided template and modify it as per your own needs.
Please share with us how you draw plasmid maps and vector maps for your thesis? We would be happy to know.
If this tutorial helped you, please share the link with your friends and colleagues and cite us in your manuscript.
If you have any questions about how to draw plasmid maps, please feel free to reach us.